How to Transfer Files to a Linux VPS using SSH?

How to Transfer Files to a Linux VPS using SSH?

How to Transfer Files to a Linux VPS using SSH?

While file transfer between windows systems is easy and straightforward, it is a little tricky when it comes to transferring files between a windows system and a Linux VPS. However, it can be done easily using SSH. In Windows, you can just copy/paste a file or folder to a different Windows VPS or PC.

We will show you how to transfer files from a windows system to a Linux VPS running Ubuntu OS. We will be using PuTTy, a popular SSH client to transfer the files.

Here are the steps you need to follow:

Transferring files between a local PC and Linux VPS:

Step 1: Download PuTTy and PuTTy SCP (pscp).

  • You need to download PuTTy, and PuTTY SCP (pscp) if you don’t have it in your system.
  • Ensure pscp.exe is in your system’s PATH or navigate to its directory using the command prompt.

Step 2: Transferring files using “pscp”.

    • Open Command Prompt. You can either search and open it or just use Windows key + R, then type cmd to open it.
    • Now navigate to the directory containing the “pscp.exe”. You can do that by running this command in the CMD.
      $ cd C:\Program Files\PuTTY

  • Use the following command to transfer the file to the Linux VPS

Command format:
$ pscp path\to\local\file username@VPS_IP:/path/to/remote/directory

To transfer C:\Users\YourUser\Documents\transfer.txt to /home/your_vps_user/ on the VPS, use this command:
$ pscp C:\Users\YourUser\Documents\transfer.txt
your_vps_user_name@VPS_IP:/home/your_vps_user/

If your VPS’s IP is: 184.164.81.56 and your files name is: transfer_test.txt and the VPS’s username is root, then the command will look like this:
$ pscp “C:\Users\farha\Documents\transfr\transfer_test.txt” root@184.164.81.56:/home/

If you want to move a folder to the linux VPS, then the command will look a bit different.

Command format:
pscp -r path\to\local\folder username@184.164.81.56:/path/to/remote/directory

If your folder’s name is “transfr”, then the actual command will look like this:
pscp -r “C:\Users\farha\Documents\transfr” root@184.164.81.56:/home/

Step 3: Verify if the file has been transferred successfully.

  • If you want to check if the file has been transferred, then open PuTTy and login to the VPS.
  • Then Navigate to the directory where you transferred it.
  • Go to the directory by using $ cd home
  • Then use this command: $ ls


If you want to remove the file, then use the “rm” command.

Step 4: Removing a file or directory if needed.

    • $ rm tranfer_test.txt
    • Then use this command: $ ls

      If you want to remove a directory, then use “rm -r” command
    • $ rm -r transfr
    • If you type $ ls again, you will no longer see the file or directory there.

This is how you can easily transfer files from your Windows VPS or PC to a Linux VPS via SSH.

Transferring files between two Linux VPS:

You can also transfer files from one Linux VPS to another Linux VPS. For that follow the instructions given below:

  • Open Command Prompt
  • Login to your Source VPS that contains your files, then type this command and hit enter:
    $ ssh root@source_vps_ip
  • Enter your VPS password. (You may be asked to type yes or y to confirm the connection before entering the password).
  • Determine which file you want to transfer and the location/directory of the file.
  • You can use the “scp” command to move files between a source VPS and a destination VPS.
  • General Command format:
    $ scp “/home/folder1/filename.ext” root@destination_ip:/home/folder2/filename.ext

Here “/home/folder1/filename.ext” is the location/directory of the file in the source VPS. This part is for the destination VPS “root@destination_ip:/home/folder2/filename.ext”.
Here root@destination_ip is the username@destination_ip, :”/home/folder2/filename.ext” is the destination directory to transfer the file/folder.

For Example, If the Destination VPS’s IP is: 170.205.52.101 and the username is “root”; and the file is in “home/transfr” directory in the Source VPS (184.164.81.56), then use the following command to transfer the file:
$ scp “/home/transfr/new_file.txt” root@170.205.52.101:/home/

If you check in this Destination VPS: 170.205.52.101 you will see the file there.

If you want to transfer the whole folder/directory, then just add “-r” after “scp”.
The command will look something like this:
$ scp -r “/home/transfr/” root@170.205.52.101:/home/

If you check again, you will see the folder there now.

You can transfer files from VPS (170.205.52.101) to VPS (184.164.81.56) too. Just change the IP and directory name accordingly.
$ scp “/file name” root@184.164.81.56:/home/
For folder/directory:
$ scp -r “/Folder or directory name/” root@184.164.81.56:/home/
This is how you can transfer files between two different Linux VPS easily.

FireVPS offers both Windows VPS/RDP and Linux VPS. Buy Windows VPS/RDP and Ryzen Linux VPS from FireVPS for your VPS hosting needs. If you are still having any issues or confusion, please feel free to knock us on Live Chat from our website. Our support team is always ready to help you.
FireVPS / Live Chat / Skype / support@firevps.net

Domain Registration

Need Domain Name?

85% Promo on Domain Names

Data Center

Dedicated RDP

Poland RDP 50% recurring discount!

Recent Post
How to disable Windows SmartScreen

Are you having issues installing a program/software after downloading it? It is not responding or doing anything after double clicking it? If yes, then you need to check if it is due to the Windows SmartScreen. Windows SmartScreen is windows operating systems default...

How to remove an IP from Remote Desktop Connection Application

Removing IP entries history from Remote Desktop Connection application: Sometimes we have to use public computer to access our RDP/VPS. The RDP/VPS IP remains there even if we do not save the RDP IP. Sometimes your RDP IP might fall into the hands of adversaries and...

How to use Microphone from RDP

Sometimes you want to use the microphone from the RDP for audio calls or meetings, but it is not possible due to the restrictions placed in shared RDP or non-admin RDPs. However, you can enable the Microphone and use it for audio calls/meetings in Admin RDP. You can...

How to Test Network Speed on Linux VPS

How to Test Network Speed on Linux VPS

How to Test Network Speed on Linux VPS

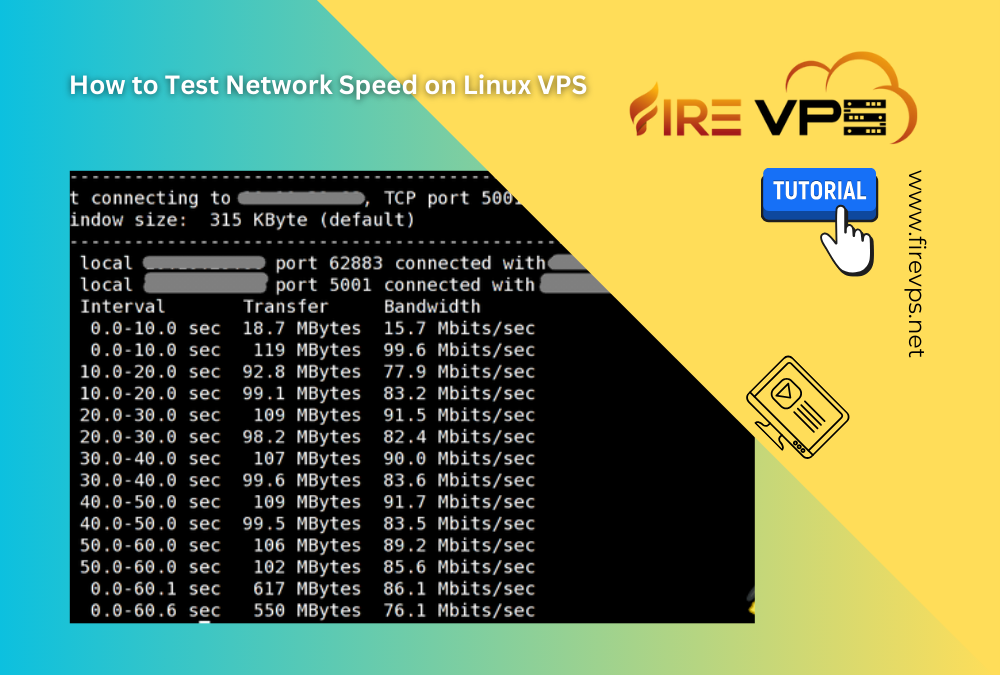
We usually check the internet speed to verify if the network is okay or if we are getting what we have paid for. For Windows, Android or other GUI (Graphical User Interface) based OS, it is pretty simple. You can just open a web browser and type “speed test”. Many results will show up and you can use any of them to check the speed. Or you can use speedtest apps like OOKLA speed test or others.

While it is pretty simple for Windows or other GUI based systems, it can be a little challenging on CLI based systems like Linux. In this tutorial, we will show you how to install a speed test application in a CLI based Linux system and check the internet speed.

For this tutorial we will be using a Linux VPS with Ubuntu 20.04

Let’s get started then…

Connect to the Linux VPS with a SSH Client like PuTTY. Once you are connected to the Linux VPS, check the version of the OS. It can be done by running this command:
$ lsb_release -a

Once you know the type and version of the Linux OS, you can continue to the next step which is installing the speedtest application via CLI.
You need to install “pip” (a python package manager) before installing the speedtest CLI. If you run the command before installing “pip”, you will get this kind of error:
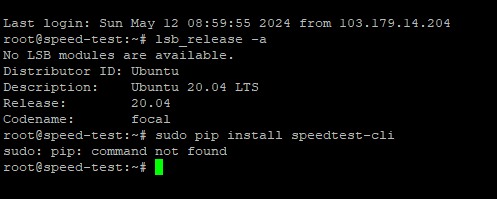
To install pip, use these commands:
$ sudo apt install python3-pip

Once the pip is installed, use this to install the speedtest CLI on the Linux VPS:
$ sudo pip install speedtest-cli

Once the installation is completed, run this to test the speed:
$ speedtest-cli


You can list the available servers and choose a specific server for checking the speed.

To list the available servers, run this command:
$ speedtest-cli –list

To select a specific server, you need to run this command (replace the SERVER_ID_OR_NAME with actual ID or name):
$ speedtest-cli –server SERVER_ID_OR_NAME

The server ID can be found by running this command:
$ speedtest-cli –list

Running this command for server ID 27746 will show this kind of result:
$ speedtest-cli –server 27746

You can even generate a shareable link of the speedtest. If you want to generate a shareable link of the speed test against server 27746, you can run this command:
$ speedtest-cli –server 27746 –share

You can go to this link to check the speedtest result on the web:
Weblink: http://www.speedtest.net/result/16241259205.png

All these tests were run on a Linux VPS running Ubuntu 20.04. The VPS was hosted on our USA server which was connected to a 10Gbps network port. The speedtest result may vary depending on the server load and network traffic. These commands will work on Debian based Linux distros.

For CentOS or RedHat or other Scientific Linux distros, you can run these commands:

To install Python:
$ sudo yum install python
or
$ sudo yum install python3

You also need to install “wget”. To install it run this command:
$ yum install wget

To download and install speedtest_cli.py:
$ wget -O speedtest-cli
https://raw.githubusercontent.com/sivel/speedtest-cli/master/speedtest.py
$ chmod +x speedtest-cli

For checking the internet speed:
$ ./speedtest-cli
Or
$ python speedtest-cli

You can run these simple commands to test the internet speed of your Linux VPS and verify you are getting what you have paid for.

FireVPS offers several Linux distros with their AMD Ryzen Linux VPS. While the default network port for the Linux VPS is 1Gbps, you can get Linux VPS from FireVPS with a 10Gbps network port. This concludes our tutorial on how to test internet speed in a Linux VPS.

If you are still having any issues or confusion, please feel free to knock us on Live Chat from our website. Our support team is always ready to help you.
FireVPS / Live Chat / Skype / support@firevps.net

Domain Registration

Need Domain Name?

85% Promo on Domain Names

Data Center

Dedicated RDP

Poland RDP 50% recurring discount!

Recent Post

How to disable Windows SmartScreen

Are you having issues installing a program/software after downloading it? It is not responding or doing anything after double clicking it? If yes, then you need to check if it is due to the Windows SmartScreen. Windows SmartScreen is windows operating systems default...

How to remove an IP from Remote Desktop Connection Application

Removing IP entries history from Remote Desktop Connection application: Sometimes we have to use public computer to access our RDP/VPS. The RDP/VPS IP remains there even if we do not save the RDP IP. Sometimes your RDP IP might fall into the hands of adversaries and...

How to use Microphone from RDP

Sometimes you want to use the microphone from the RDP for audio calls or meetings, but it is not possible due to the restrictions placed in shared RDP or non-admin RDPs. However, you can enable the Microphone and use it for audio calls/meetings in Admin RDP. You can...

How to Install Magento on Ryzen/Linux VPS – FireVPS

How to Install Magento on Ryzen/Linux VPS – FireVPS

How to Install Magento on Ryzen/Linux VPS – FireVPS

Installing Magento on a Ryzen-powered Linux VPS can significantly enhance your e-commerce platform’s performance. Magento is a popular open-source e-commerce platform, and with FireVPS, you can leverage powerful Ryzen processors to ensure your online store runs smoothly and efficiently. In this guide, we’ll provide a step-by-step tutorial on how to install Magento on a Linux VPS.

Prerequisites

Before you begin, ensure you have the following:

  1. A Ryzen-powered Linux VPS from FireVPS.
  2. SSH access to your VPS.
  3. A domain name pointed to your VPS.
  4. Basic knowledge of Linux command line.
  5. A LAMP stack (Linux, Apache, MySQL, PHP) installed on your VPS.

Step 1: Access Your VPS

  1. Open your terminal (or use an SSH client like PuTTY).
  2. Connect to your VPS using SSH:
sh
ssh root@your_vps_ip

Step 2: Update Your System

Before installing anything, update your package manager:

sh
sudo apt update && sudo apt upgrade -y

Step 3: Install Apache

If you don’t have Apache installed, you can install it using the following command:

sh
sudo apt update && sudo apt upgrade -y

Start and enable Apache to run on boot:

sh
sudo systemctl start apache2
sudo systemctl enable apache2

Step 4: Install MySQL

Magento requires a database to store data. Install MySQL using:

sh
sudo apt install mysql-server -y

Secure your MySQL installation:

sh
sudo mysql_secure_installation

Create a database for Magento:

sh
sudo mysql -u root -p

Inside the MySQL prompt, run the following commands:

sql
CREATE DATABASE magento;
CREATE USER ‘magentouser’@’localhost’ IDENTIFIED BY ‘yourpassword’;
GRANT ALL PRIVILEGES ON magento.* TO ‘magentouser’@’localhost’;
FLUSH PRIVILEGES;
EXIT;

Step 5: Install PHP

Magento requires PHP. Install PHP and necessary extensions:

sh
sudo apt install php libapache2-mod-php php-mysql php-cli php-common
php-gd php-curl php-intl php-xsl php-mbstring php-zip php-soap php-bcmath -y

Step 6: Configure Apache for Magento

Create a new virtual host configuration file for Magento:

sh
sudo nano /etc/apache2/sites-available/magento.conf

Add the following configuration:

apache


ServerAdmin admin@yourdomain.com
DocumentRoot /var/www/html/magento
ServerName yourdomain.com
ServerAlias www.yourdomain.com
<Directory/var/www/html/magento/>
Options Indexes FollowSymLinks MultiViews
AllowOverride All
Order allow,deny
allow from all

ErrorLog ${APACHE_LOG_DIR}/magento_error.log
CustomLog ${APACHE_LOG_DIR}/magento_access.log combined


Enable the new site and rewrite module:

sh
sudo a2ensite magento.conf
sudo a2enmod rewrite
sudo systemctl restart apache2

Step 7: Install Composer

Magento uses Composer for managing dependencies. Install Composer using:

sh
sudo apt install curl -y
curl -sS https://getcomposer.org/installer | php
sudo mv composer.phar /usr/local/bin/composer

Step 8: Download Magento

Navigate to the web root directory and download Magento:

sh
cd /var/www/html
sudo composer create-project –repository-url=https://repo.magento.com/
magento/project-community-edition magento

You’ll be prompted for Magento authentication keys, which you can get from the Magento Marketplace.

Step 9: Set the Correct Permissions

Set the correct permissions for Magento:

sh
sudo chown -R www-data:www-data /var/www/html/magento
sudo find /var/www/html/magento -type d -exec chmod 755 {} \;
sudo find /var/www/html/magento -type f -exec chmod 644 {} \;

Step 10: Install Magento

Run the Magento setup script:

sh
cd /var/www/html/magento
sudo bin/magento setup:install \
–base-url=http://yourdomain.com \
–db-host=localhost \
–db-name=magento \
–db-user=magentouser \
–db-password=yourpassword \
–admin-firstname=First \
–admin-lastname=Last \
–admin-email=admin@yourdomain.com \
–admin-user=admin \
–admin-password=admin123 \
–language=en_US \
–currency=USD \
–timezone=America/Chicago \
–use-rewrites=1

Step 11: Finalize Installation

Once the installation is complete, configure Apache to serve the Magento directory:

sh
sudo nano /etc/apache2/sites-available/000-default.conf

Change the DocumentRoot to point to /var/www/html/magento:

apache
DocumentRoot /var/www/html/magento

Restart Apache:

sh
sudo systemctl restart apache2

Step 12: Access Your Magento Store

Open your web browser and go to http://yourdomain.com. You should see the Magento storefront. Access the admin panel by going to http://yourdomain.com/admin.

Conclusion

By following these steps, you can successfully install Magento on a Ryzen-powered Linux VPS from FireVPS. With FireVPS, you get a robust, high-performance environment that ensures your Magento store runs smoothly and efficiently. Enjoy the benefits of a powerful VPS and a flexible, feature-rich e-commerce platform to take your online business to the next level. If you encounter any issues, FireVPS’s excellent customer support is always available to assist you.
For further customization and optimization, consider exploring additional Magento extensions and configurations tailored to your business needs. Happy selling!

Domain Registration

Need Domain Name?

85% Promo on Domain Names

Data Center

Dedicated RDP

Poland RDP 50% recurring discount!

Recent Post

How to disable Windows SmartScreen

Are you having issues installing a program/software after downloading it? It is not responding or doing anything after double clicking it? If yes, then you need to check if it is due to the Windows SmartScreen. Windows SmartScreen is windows operating systems default...

How to remove an IP from Remote Desktop Connection Application

Removing IP entries history from Remote Desktop Connection application: Sometimes we have to use public computer to access our RDP/VPS. The RDP/VPS IP remains there even if we do not save the RDP IP. Sometimes your RDP IP might fall into the hands of adversaries and...

How to use Microphone from RDP

Sometimes you want to use the microphone from the RDP for audio calls or meetings, but it is not possible due to the restrictions placed in shared RDP or non-admin RDPs. However, you can enable the Microphone and use it for audio calls/meetings in Admin RDP. You can...

What Is Windows VPS? A Guide to Windows Virtual Private Servers – FireVPS

What Is Windows VPS? A Guide to Windows Virtual Private Servers – FireVPS

What Is Windows VPS? A Guide to Windows Virtual Private Servers – FireVPS

A Windows Virtual Private Server (VPS) is a powerful, flexible hosting solution that offers the benefits of a dedicated server at a more affordable price. In this guide, we’ll cover everything you need to know about Windows VPS, including its key highlights, pros and cons, use cases, and comparisons with other hosting solutions. Whether you’re considering a VPS for your business or personal projects, FireVPS provides reliable and high-performance services to meet your needs.

What is Windows VPS?

A Windows VPS is a virtual server running a Windows operating system. It provides a virtualized environment where you can install software, host websites, and manage applications just like on a physical server. Unlike shared hosting, a VPS offers dedicated resources such as CPU, RAM, and storage, ensuring better performance and reliability.

Key Features of Windows VPS

Dedicated Resources: Unlike shared hosting, a Windows VPS allocates dedicated CPU, RAM, and storage to your server, ensuring consistent performance.

Full Administrative Access: You get full administrative control over your server, allowing you to install, configure, and manage software and settings as you see fit.

Scalability: Easily upgrade or downgrade your resources based on your needs without any downtime.

Enhanced Security: With isolated environments, Windows VPS provides better security compared to shared hosting. Your data and applications are safe from other users on the same physical server.

Remote Desktop Access: Access your server remotely via Remote Desktop Protocol (RDP), allowing you to manage it from anywhere.

Automatic Backups: Regular automated backups ensure your data is safe and can be restored quickly if needed.

Key Highlights

High Performance: With dedicated resources, Windows VPS ensures high performance for your applications and websites.

Flexibility: Install and run any Windows-based software or application.

Ease of Use: The familiar Windows interface makes it easy for users, especially those who are not familiar with Linux.

Cost-Effective: Provides the benefits of a dedicated server at a fraction of the cost.

24/7 Support: Many Windows VPS providers offer round-the-clock support to help you with any issues.

Pros and Cons

Pros:

  • Performance: Dedicated resources ensure reliable and consistent performance.
  • Customization: Full control allows you to install and configure software as needed.
  • Security: Enhanced security features with isolated environments.
  • Scalability: Easily upgrade resources as your business grows.
  • Familiar Interface: Easy to use, especially for users familiar with Windows.

Cons:

  • Cost: More expensive than shared hosting.
  • Management: Requires some technical knowledge to manage and configure the server.
  • Resource Limits: Although better than shared hosting, a VPS still has resource limits compared to dedicated servers.

Windows VPS Use Cases

  • Website Hosting: Ideal for hosting high-traffic websites that need reliable performance.
  • Application Hosting: Suitable for running business applications that require a stable and isolated environment.
  • Development and Testing: Great for developers needing a customizable environment for testing and development.
  • Remote Desktop Services: Can be used to set up RDP for remote access.
  • Database Servers: Efficient for running SQL Server and other database applications.

Difference Between Windows VPS vs. Linux VPS

FeatureWindows VPSLinux VPS
Operating SystemWindows ServerVarious Linux distributions (Ubuntu, CentOS, etc.)
Ease of UseUser-friendly, familiar interfaceRequires more technical knowledge
Software SupportBest for applications requiring WindowsBest for open-source applications
CostGenerally more expensiveUsually cheaper
SecurityGood, but depends on user configurationGenerally considered very secure
Community SupportExtensive support from MicrosoftLarge community support for various distros

Benefits of Windows VPS

  • Familiar Interface: Easy to use for those familiar with Windows operating systems.
  • Wide Compatibility: Supports a wide range of Windows-based applications and software.
  • Excellent Support: Many software vendors provide support specifically for Windows servers.
  • Remote Desktop Access: Easily access and manage your server using RDP.
  • Performance: Dedicated resources ensure that your applications run smoothly.

How Windows VPS Compares to Other Hosting Solutions

FeatureShared HostingWindows VPSDedicated ServerCloud Hosting
ResourcesShared among multiple usersDedicated resourcesAll resources dedicatedScalable resources
ControlLimited control and customizationFull control and customizationFull controlFull control
PerformanceVariable, can be affected by othersConsistent, high performanceHighest performanceVariable, depends on setup
SecurityBasic security, shared environmentEnhanced security, isolated environmentHighest securityHigh security, but shared
CostCheapest optionMid-range costMost expensiveVaries, can be cost-effective
ScalabilityLimitedEasy to scaleDifficult to scale quicklyEasily scalable, pay as you go

Is Windows VPS the Same as RDP?

No, a Windows VPS and RDP are not the same. A Windows VPS is a virtual server running a Windows operating system, giving you full control over the server environment. RDP (Remote Desktop Protocol) is a tool that allows you to connect to and control a remote computer. While you can use RDP to access your Windows VPS, they are distinct concepts. A Windows VPS is the server itself, and RDP is a method for accessing and managing it remotely.

Setting Up a Windows VPS

  1. Choose a Provider: Select a reliable VPS provider like FireVPS.
  2. Select Your Plan: Choose a plan that fits your resource requirements.
  3. Set Up Your Server: Use the control panel to install and configure your Windows VPS.
  4. Access via RDP: Use Remote Desktop Protocol to access and manage your server.
  5. Install Software: Install any applications or software needed for your operations.
  6. Configure Security: Set up firewalls, antivirus software, and other security measures to protect your VPS.

Factors to Consider When Choosing a Windows VPS Provider

  • Reliability: Look for a provider with a strong uptime record and reliable performance.
  • Customer Support: Ensure they offer 24/7 support to help with any issues that arise.
  • Scalability: Choose a provider that allows for easy upgrades as your needs grow.
  • Security: Check for robust security features, including firewalls and regular backups.
  • Cost: Compare pricing and features to get the best value for your budget.
  • Ease of Use: Consider how easy it is to set up and manage your VPS with the provider’s tools and interfaces.

Conclusion

A Windows VPS offers a powerful, customizable, and secure hosting solution for businesses and individuals. Whether you need to host websites, run applications, or develop software, a Windows VPS provides the dedicated resources and control necessary for optimal performance. FireVPS offers reliable and high-performance Windows VPS solutions to support your business growth and success. Evaluate your needs, consider the factors mentioned, and choose the best Windows VPS provider to ensure your projects thrive.

Domain Registration

Need Domain Name?

85% Promo on Domain Names

Data Center

Dedicated RDP

Poland RDP 50% recurring discount!

Recent Post

How to disable Windows SmartScreen

Are you having issues installing a program/software after downloading it? It is not responding or doing anything after double clicking it? If yes, then you need to check if it is due to the Windows SmartScreen. Windows SmartScreen is windows operating systems default...

How to remove an IP from Remote Desktop Connection Application

Removing IP entries history from Remote Desktop Connection application: Sometimes we have to use public computer to access our RDP/VPS. The RDP/VPS IP remains there even if we do not save the RDP IP. Sometimes your RDP IP might fall into the hands of adversaries and...

How to use Microphone from RDP

Sometimes you want to use the microphone from the RDP for audio calls or meetings, but it is not possible due to the restrictions placed in shared RDP or non-admin RDPs. However, you can enable the Microphone and use it for audio calls/meetings in Admin RDP. You can...

The Best Linux Distribution (Distro) for Your VPS in 2024 – FireVPS

The Best Linux Distribution (Distro) for Your VPS in 2024 – FireVPS

The Best Linux Distribution (Distro) for Your VPS in 2024 – FireVPS

Choosing the right Linux distribution (distro) for your Virtual Private Server (VPS) is crucial for maximizing performance, security, and ease of use. For this we need to find the best VPS hosting. In 2024, several Linux distros stand out due to their stability, support, and features. In this blog, we will explore the best Linux distros for your VPS hosted by FireVPS, comparing their differences and highlighting their benefits.

Why Linux for VPS?

Before diving into the best distros, let’s discuss why Linux is the preferred choice for VPS:

Security: Linux is known for its robust security features, making it a reliable choice for servers that need to handle sensitive data and protect against cyber threats.

Stability: Linux distros are stable and can run for long periods without needing a reboot. This ensures your server remains operational, minimizing downtime.

Cost-effective: Most Linux distros are free to use, which can significantly reduce operating costs.

Performance: Linux is lightweight and efficient, making it ideal for VPS where resources are shared among multiple users.

FireVPS – Your Trusted VPS Provider

FireVPS offers reliable, high-performance VPS solutions to meet various business needs. With data centers located worldwide, including the USA, Canada, Australia, Germany, and the UK, FireVPS ensures fast and secure hosting services. When you choose FireVPS, you get top-tier infrastructure and excellent customer support, making it easier to focus on selecting the best Linux distro for your VPS.

Top Linux Distributions for VPS in 2024

Here are the top Linux distros for your VPS in 2024:

    • Ubuntu Server
    • CentOS Stream
    • Debian
    • Fedora Server
    • AlmaLinux


    Ubuntu Server is one of the most popular choices for VPS due to its user-friendly nature and strong community support.

    • Pros:

      Regular Updates and a Large Community: Ubuntu’s large user base means that any issues are quickly identified and resolved, with frequent updates to enhance security and performance.

      Extensive Documentation: There is a wealth of online resources, tutorials, and guides available to help users at all levels.

      Long-Term Support (LTS) Versions Offer Stability: LTS versions are supported for five years, providing a reliable and stable environment for long-term projects.

    • Cons:

      Resource-Intensive: Ubuntu can be more resource-heavy compared to other distros, which might not be ideal for VPS plans with limited resources.

    Ideal for: Beginners and those who need a stable, well-supported server environment. Consider this if you’re looking for the best Ubuntu VPS experience.


    CentOS Stream is a rolling-release distro that sits between Fedora and RHEL (Red Hat Enterprise Linux).

    • Pros:

      Continuously Updated, Providing Newer Features: CentOS Stream receives updates ahead of RHEL, offering newer features and improvements.

      Strong Red Hat Backing: Being closely related to RHEL, CentOS Stream benefits from the robust support and stability of Red Hat.

    • Cons:

      Changes Can Sometimes Lead to Instability: Since it is a rolling-release, there can be occasional instability due to frequent updates.

    Ideal for: Users who need a balance between stability and cutting-edge features.


    Debian is known for its stability and reliability, making it a favorite among experienced users.

    • Pros:

      Extremely Stable: Debian is renowned for its stability, making it a great choice for critical applications.

      Large Software Repository: Debian offers a vast repository of software packages, ensuring users have access to a wide range of applications.

    • Cons:

      Slower Release Cycle Means Fewer New Features: Debian’s focus on stability means that new features are introduced at a slower pace compared to other distros.

    Ideal for: Users who prioritize stability and security over having the latest features. For a reliable and robust option, consider Debian VPS hosting.


    Fedora Server offers the latest features and technologies, often serving as a testing ground for Red Hat.

    • Pros:

      Cutting-Edge Technologies: Fedora is often the first to implement new technologies, making it ideal for users who want to stay ahead of the curve.

      Regular Updates: Fedora receives regular updates, ensuring users have access to the latest features and security improvements.

    • Cons:

      Shorter Lifecycle Means More Frequent Upgrades: Fedora’s shorter release cycle requires users to upgrade more frequently to stay supported.

    Ideal for: Users who want the latest technologies and are comfortable with regular updates.


    AlmaLinux is a community-driven project that aims to be a 1:1 binary-compatible fork of RHEL.

    • Pros:

      RHEL Compatibility: AlmaLinux is fully compatible with RHEL, making it an excellent free alternative for users who prefer RHEL’s features and stability.

      Community Support: AlmaLinux has strong community backing, ensuring continuous improvements and updates.

    • Cons:

      Newer Project, So It Might Have Less Community Support Compared to Older Distros: As a newer project, AlmaLinux’s community is still growing, which might mean fewer resources compared to more established distros.

    Ideal for: Users looking for a free, RHEL-compatible distro with community backing.


    Comparison Table

    FeatureUbuntu ServerCentOS StreamDebianFedora ServerAlmaLinux
    StabilityHighMediumVery HighMediumHigh
    Ease of UseVery HighHighMediumMediumHigh
    CommunityVery LargeLargeLargeMediumMedium
    Update CycleRegularRollingSlowRegularRegular
    Cutting-edgeMediumHighLowVery HighMedium


    Benefits of Each Distro

    Ubuntu Server Benefits:

      Easy to Use: Ubuntu’s popularity means there is a wealth of tutorials and support available, making it easy for beginners to get started.

      LTS Versions: Long-term support versions are available for those who need a stable, reliable server. These versions have been supported for five years, offering peace of mind for long-term projects.

    CentOS Stream Benefits:

      Continuous Updates: Receive updates and new features continuously, ensuring your server has the latest improvements.

      Red Hat Support: Backed by Red Hat, CentOS Stream benefits from the robust support and stability of Red Hat, making it a reliable choice for many users.

    Debian Benefits:

      Rock-solid Stability: Known for its stability, Debian is an excellent choice for critical applications where uptime is essential.

      Security: Debian has a strong focus on security, with regular updates and a large repository of tested software packages.

    Fedora Server Benefits:

      Latest Features: Always get the latest features and technologies first, making Fedora ideal for users who want to stay ahead of the curve.

      Innovation: Fedora is often the first to implement new technologies, making it a great choice for developers and tech enthusiasts who want to experiment with the latest advancements.

    AlmaLinux Benefits:

      RHEL Compatibility: Fully compatible with RHEL, AlmaLinux offers a free alternative with the same features and stability.

      Community Driven: Strong community support ensures continuous improvement and updates, making it a reliable choice for users looking for a RHEL-compatible distro.

    Conclusion

    Choosing the right Linux distro for your VPS depends on your specific needs. If you are a beginner or need extensive support, Ubuntu Server might be the best choice. For those needing a balance between new features and stability, CentOS Stream is ideal. If stability and security are your top priorities, Debian is a solid choice. For users who want the latest technologies, Fedora Server is the way to go. Lastly, if you need RHEL compatibility with community support, AlmaLinux is an excellent option.

    With FireVPS, you get the best infrastructure to host your preferred Linux distro. FireVPS’ reliable, high-performance VPS solutions ensure your server runs smoothly, securely, and efficiently, providing a strong foundation for your online endeavors. For those looking to buy cheap VPS hosting, FireVPS is the perfect choice.

    Evaluate your needs and choose the distro that aligns best with your requirements. No matter which you choose, FireVPS will support you with top-tier hosting services and excellent customer support to help your business succeed. Whether you’re looking for the best Linux VPS or considering a Ryzen VPS for enhanced performance, FireVPS has got you covered.

Domain Registration

Need Domain Name?

85% Promo on Domain Names

Data Center

Dedicated RDP

Poland RDP 50% recurring discount!

Recent Post

How to disable Windows SmartScreen

Are you having issues installing a program/software after downloading it? It is not responding or doing anything after double clicking it? If yes, then you need to check if it is due to the Windows SmartScreen. Windows SmartScreen is windows operating systems default...

How to remove an IP from Remote Desktop Connection Application

Removing IP entries history from Remote Desktop Connection application: Sometimes we have to use public computer to access our RDP/VPS. The RDP/VPS IP remains there even if we do not save the RDP IP. Sometimes your RDP IP might fall into the hands of adversaries and...

How to use Microphone from RDP

Sometimes you want to use the microphone from the RDP for audio calls or meetings, but it is not possible due to the restrictions placed in shared RDP or non-admin RDPs. However, you can enable the Microphone and use it for audio calls/meetings in Admin RDP. You can...