Setting Up a Managed USA VPS with FireVPS: A No-Code Guide for Non-Tech Entrepreneurs

Setting Up a Managed USA VPS with FireVPS: A No-Code Guide for Non-Tech Entrepreneurs

Md. Farhan Hasin Fuad November 19, 2025

How to Set Up a Managed USA VPS on FireVPS (No Coding Required)

In today's digital world, having a reliable online presence is crucial for businesses. Whether you’re launching an e-commerce store, a blog, or a SaaS platform, a Managed USA VPS (Virtual Private Server) from FireVPS can be an excellent solution. But what if you don’t have technical expertise? No worries! This guide will walk you through the process of setting up a Managed USA VPS on FireVPS without writing a single line of code.

Why Choose FireVPS for a Managed USA VPS?

FireVPS offers several powerful advantages compared to traditional shared hosting:
  • Dedicated Resources: Unlike shared hosting, a VPS provides dedicated CPU, RAM, and storage.
  • Better Performance: Faster load times and improved security for your website or application.
  • Fully Managed Services: FireVPS handles server management, updates, and security so you can focus on your business.
  • Scalability: Easily upgrade resources as your business grows.

Step 1: Choose a Managed USA VPS Plan on FireVPS

Visit the FireVPS USA VPS Plans page and compare plans based on RAM, CPU cores, and storage. If you’re running a small business website or an online store, start with a mid-tier plan (e.g., 2–4 vCPU, 4–8 GB RAM, and SSD storage). All plans typically include:
  • 24/7 expert support
  • Automatic backups
  • High-speed SSD storage

Step 2: Register a Domain Name

If you don’t have a domain yet, register one through FireVPS or providers like Namecheap, GoDaddy, or Cloudflare. FireVPS also offers domain registration and management services for added convenience, so you can keep your hosting and domains in one place.

Step 3: Choose a Pre-Configured Application

FireVPS allows you to install popular web applications with just a few clicks — no coding needed. Common options include:
  • WordPress: For blogs, business websites, and landing pages.
  • WooCommerce: For feature-rich e-commerce stores.
  • cPanel/WHM: For managing multiple websites, email accounts, and more.
Simply select the application you need during setup and FireVPS will handle the installation automatically on your VPS.

Step 4: Configure Your Website (No Coding Needed)

Once your application is installed, you can customize your website using beginner-friendly, drag-and-drop tools such as:
  • Elementor (for WordPress): Build beautiful pages by dragging and dropping sections, images, and text.
  • WooCommerce + themes: Create product pages, checkout flows, and cart pages visually.
FireVPS can also provide access to premium themes and plugins to enhance your site’s design, performance, and functionality.

Step 5: Secure Your VPS with FireVPS

Even with managed services, it’s important to follow basic security best practices. With FireVPS, most of this is handled for you, but you should still:
  • Enable an SSL Certificate: FireVPS provides free SSL certificates to secure data between your site and visitors.
  • Set Up Automatic Backups: FireVPS manages daily backups so you can quickly restore your site if needed.
  • Use Cloudflare or Similar Services: Add extra protection against DDoS attacks and improve global content delivery.

Step 6: Monitor Performance and Get Support

FireVPS includes a user-friendly dashboard where you can monitor:
  • Server and website performance
  • Uptime and resource usage
  • Security and updates
If you ever run into issues, FireVPS provides 24/7 customer support so you can get expert help whenever you need it.

Conclusion

Setting up a Managed USA VPS with FireVPS doesn’t require coding skills or technical expertise. With a user-friendly interface, fully managed support, and high-performance hosting, you can have your website or business platform up and running in no time. Focus on growing your business while FireVPS handles the technical side!
Ready to launch your Managed VPS? Visit FireVPS USA VPS Plans today and take your online business to the next level!

What is a USA VPS? A Beginner’s Guide to Virtual Private Servers

What is a USA VPS? A Beginner’s Guide to Virtual Private Servers

Md. Farhan Hasin Fuad November 19, 2025

Overview

If you’ve ever felt overwhelmed by terms like “VPS,” “shared hosting,” or “dedicated servers,” you’re not alone. Choosing the right hosting solution can make or break your website’s performance, security, and growth. In this guide, we’ll demystify USA VPS hosting, explain how it works, and reveal why opting for a US-based server could be a game-changer for your online presence.

What is a VPS?

A Virtual Private Server (VPS) is a type of web hosting that splits a physical server into multiple virtual “compartments.” Each compartment acts like a standalone server with its own operating system, storage, and resources (CPU, RAM, bandwidth). Think of it like renting a private apartment in a large building: you get dedicated space and control, without the cost of owning the entire building.

VPS vs. Other Hosting Types

  • Shared Hosting: Like living in a dorm room. You share resources (and noise!) with others. Cheap but limited.
  • Dedicated Server: Owning the entire building. Full control, but expensive and complex.
  • VPS Hosting: The sweet spot. Private space, dedicated resources, and scalability at a fraction of the cost of a dedicated server.

How Does a USA VPS Work?

A USA VPS uses virtualization technology to partition a physical server in a US-based data center. Here’s a simplified breakdown:
  • Physical Server: A powerful machine housed in a secure US data center.
  • Hypervisor: Software (like VMware or KVM) that divides the server into virtual compartments.
  • Virtual Servers: Each VPS operates independently, with its own OS (Windows/Linux), apps, and settings.
Your website lives on one of these virtual servers, isolated from others. This means:
  • No “Noisy Neighbors”: Other sites on the same physical server can’t hog your resources.
  • Full Control: Install custom software, configure security, and reboot without affecting others.
  • Scalability: Easily upgrade RAM, storage, or bandwidth as your traffic grows.

Why Choose a USA VPS?

Location matters when it comes to hosting. Here’s why a US-based VPS stands out:

1. Speed & Latency for US Audiences

If your target audience is primarily in North America, a USA VPS reduces latency (delay in data transfer). For example: a visitor in New York connects faster to a server in Texas than to one in Europe. Faster load times = happier users, lower bounce rates, and better SEO rankings.

2. Data Sovereignty & Compliance

US data centers follow strict regulations like:
  • CCPA (California Consumer Privacy Act): Protects user data for California residents.
  • HIPAA: Critical for healthcare businesses storing patient data.
Hosting in the US helps you align with local laws and avoid potential legal issues.

3. SEO Benefits

Search engines like Google often prioritize local server locations for regional searches. A USA VPS can boost your visibility for US-based keywords.

4. 24/7 Support in Your Time Zone

US providers typically offer support during business hours aligned with your schedule, ensuring quicker resolutions.

Who Needs a USA VPS?

A USA VPS is ideal for:
  • Small Businesses: Scaling e-commerce stores or membership sites without downtime.
  • Developers: Testing apps, running custom scripts, or hosting client projects.
  • Content Creators: Streaming videos, podcasts, or high-traffic blogs smoothly.
  • Agencies: Managing multiple client websites securely.

Key Features of a USA VPS

  • Guaranteed Uptime (99.9%+): Minimal downtime for your site.
  • Root Access: Full control to install software or tweak settings.
  • Enhanced Security: Isolated environment plus options for firewalls, SSL, and backups.
  • Scalability: Upgrade resources instantly as your needs evolve.

How to Choose a USA VPS Provider

  • Data Center Locations: Look for providers with servers in multiple US cities (e.g., New York, Los Angeles).
  • Managed vs. Unmanaged: Beginners should choose managed VPS (provider handles updates, security, and support).
  • Customer Reviews: Check ratings for uptime, speed, and support quality.
FireVPS offers managed USA VPS plans with 24/7 support, free migrations, and a 99.99% uptime guarantee.

Final Thoughts

A USA VPS blends the affordability of shared hosting with the power of a dedicated server. Whether you’re launching a blog, scaling an online store, or running resource-heavy apps, a US-based VPS ensures speed, reliability, and compliance.
Ready to experience the difference? Upgrade to a USA VPS today and give your website the performance boost it deserves. 👉 Explore FireVPS USA VPS Hosting Plans 👈

When Do You Need a VPS in the United States?

When Do You Need a VPS in the United States?

Md. Farhan Hasin Fuad November 18, 2025

Overview

A Virtual Private Server (VPS) is a powerful tool that combines the affordability of shared hosting with the control and performance of dedicated servers. If your target audience, business operations, or technical requirements align with the United States, opting for a USA-based VPS is a strategic choice. But when exactly do you need a VPS in the United States? Let’s explore the most common scenarios.

1. Serving an Audience in the United States

If your website or application caters primarily to users in the USA, hosting it on a VPS located within the country ensures:
    • Low Latency: Faster load times and smooth performance for users.
    • Improved SEO Rankings: Search engines prioritize websites hosted closer to their target audience.
    • Enhanced User Experience: Reduced delays lead to better engagement and satisfaction.

2. Access to USA-Specific Services

Certain services, websites, or platforms restrict access based on geographical location. A USA VPS allows you to:
    • Access region-locked content or tools.
    • Operate services requiring a US-based IP address, such as financial platforms or SaaS tools.
    • Bypass geo-restrictions for legitimate business purposes.

3. Legal or Regulatory Compliance

Many industries, such as finance, healthcare, or e-commerce, require businesses to comply with country-specific data storage regulations. A USA VPS ensures:
    • Compliance with US Laws: Store sensitive data on servers within the country.
    • Secure Transactions: Use servers that meet PCI DSS and other regulatory standards.

4. Expanding Your Business to the USA

When scaling operations to the United States, having a VPS in the region offers significant benefits:
    • Localized Hosting: Ensure your website or app performs optimally for US-based clients.
    • Easier Collaboration: Seamless integration with partners or vendors in the US.
    • Reliable Backups and Redundancy: US-based data centers have robust infrastructure and disaster recovery options.

5. Running Applications Requiring High Performance

USA VPS servers are ideal for running resource-intensive applications such as:
    • E-commerce Platforms: Host secure and scalable online stores with fast checkout processes.
    • Gaming Servers: Provide low-latency experiences for US players.
    • Development Projects: Deploy and test applications in a high-performance environment.

6. Need for Scalability and Flexibility

A USA VPS is perfect when you require flexibility to scale resources based on your needs:
    • Startups and SMEs: Easily upgrade resources as your business grows.
    • Seasonal Businesses: Adjust server capacity during peak seasons like Black Friday or holiday sales.

7. Remote Work and VPN Services

With the rise of remote work, many businesses and individuals use a VPS to:
    • Set up secure VPNs for accessing sensitive data from anywhere.
    • Enable remote desktop solutions with a USA IP for team members.
    • Host virtual workspaces for collaboration and productivity.

8. Cost-Effective Hosting in a Premium Market

Hosting a VPS in the USA provides access to top-tier infrastructure and data centers at competitive prices. You benefit from:
    • Reliability: High uptime and consistent performance.
    • Scalability: Pay for what you use without overcommitting to dedicated server costs.
    • Global Connectivity: Ideal for US and international customers.

Conclusion

A USA-based VPS is more than just a hosting solution—it’s a strategic advantage for businesses and individuals with a focus on the United States. Whether you’re targeting US-based customers, ensuring compliance with regulations, or leveraging the country’s world-class infrastructure, a VPS in the USA offers the performance, flexibility, and reliability you need.
Ready to harness the power of a USA VPS? Explore our hosting plans and take your business or projects to the next level!

Unable to Locate Package phpmyadmin on Ubuntu VPS? Fix It in Minutes

Unable to Locate Package phpmyadmin on Ubuntu VPS? Fix It in Minutes

Sharwat Shafin July 3, 2025

Why the "Unable to locate package phpmyadmin" Error Occurs

If you've recently launched a fresh Ubuntu VPS and tried running:

Code
sudo apt install phpmyadmin

...you might see:

Code
E: Unable to locate package phpmyadmin

This happens because:

  • The phpmyadmin package isn't in the default Ubuntu 20.04/22.04 repositories
  • Some VPS providers ship minimal OS images with limited software sources
  • The universe repository (where phpmyadmin resides) isn't enabled

Prerequisites Before Installing phpMyAdmin

Make sure:

  • You're using a Ubuntu 20.04 or 22.04 VPS
  • You have sudo/root access
  • Your VPS is connected to the internet

If you don't have a VPS yet, check out our Ubuntu VPS Hosting Plans (Ryzen VPS page link) with root access and managed support for LAMP/LEMP setup.

Step-by-Step Fix for Ubuntu VPS

Step 1: Update Package Lists

Code
sudo apt update && sudo apt upgrade -y

Step 2: Enable the Universe Repository

Code
sudo add-apt-repository universe
sudo apt update

Step 3: Install phpMyAdmin

Code
sudo apt install phpmyadmin -y

During installation:

  • Select the web server (Apache or Lighttpd)
  • Configure the database with dbconfig-common
  • Set a password for phpmyadmin user

Step 4: Enable PHP Extension and Restart Apache (if needed)

Code
sudo phpenmod mysqli
sudo systemctl restart apache2

Step 5: Access phpMyAdmin

Open your browser and visit:

http://your-server-ip/phpmyadmin

Need a secure domain with SSL? Register a secure Domain. (Domain page link)

Common Mistakes to Avo

  • Missing universe repo → Use add-apt-repository universe
  • Wrong Ubuntu version → Some older versions dropped support
  • Incomplete LAMP setup→ Make sure Apache, PHP, and MySQL are installe

Alternatives to phpMyAdmin

If phpMyAdmin feels heavy or complex, here are some alternatives:


ToolDescription
AdminerLightweight PHP-based DB admin
MySQL CLIDefault command-line client
HeidiSQLGUI-based, works via SSH tunnel

Need help choosing the right stack? Explore our Managed VPS Services (Xeon VPS page) for assistance.

Final Thoughts and Related Resources

Getting the "Unable to locate package phpmyadmin" error is common on new VPS setups, but it's easily fixable by enabling the correct APT repositories. With a properly configured LAMP stack, phpMyAdmin gives you powerful, browser-based database control.

Conclusion

The “Unable to locate package phpmyadmin” error can be frustrating, especially when setting up a fresh Ubuntu VPS. But in most cases, it simply comes down to missing repositories or outdated package lists. By enabling the universe repository and properly configuring your system, you’ll have phpMyAdmin installed and running in just a few minutes.

Whether you're managing databases, deploying a website, or configuring a full web stack, having a stable and well-supported VPS environment makes all the difference.

Frequently Asked Questions (FAQ)

Why am I getting 'Unable to locate package phpmyadmin' on Ubuntu?

This error occurs because the phpmyadmin package is not available in the default Ubuntu 20.04 or 22.04 repositories. You need to enable the universe repository and update your APT sources to install it.

How do I fix the 'Unable to locate package phpmyadmin' error on my VPS?
To fix this error, run the following commands

sudo add-apt-repository universe
sudo apt update
sudo apt install phpmyadmin

This will enable the required repository and install phpMyAdmin on your Ubuntu VPS.

Is phpMyAdmin available on Ubuntu 22.04?

Yes, phpMyAdmin is available on Ubuntu 22.04, but it is not included in the default package sources. You must manually enable the universe repository using:

sudo add-apt-repository universe

Then update your package list with sudo apt update.

Can I install phpMyAdmin on a VPS with a LAMP stack?
Yes, phpMyAdmin works perfectly with a LAMP stack (Linux, Apache, MySQL, PHP). Just ensure that all components are properly installed and configured before installing phpMyAdmin.
What are some alternatives to phpMyAdmin for database management?

Some popular alternatives include:

  • Adminer – a lightweight PHP-based database management tool.
  • MySQL CLI – command-line client for advanced users.
  • MySQL Workbench – a GUI-based tool (run locally and connect via SSH).

These tools can also be used effectively on a VPS

How to Transfer Files to a Linux VPS using SSH?

How to Transfer Files to a Linux VPS using SSH?

How to Transfer Files to a Linux VPS using SSH?

While file transfer between windows systems is easy and straightforward, it is a little tricky when it comes to transferring files between a windows system and a Linux VPS. However, it can be done easily using SSH. In Windows, you can just copy/paste a file or folder to a different Windows VPS or PC.

We will show you how to transfer files from a windows system to a Linux VPS running Ubuntu OS. We will be using PuTTy, a popular SSH client to transfer the files.

Here are the steps you need to follow:

Transferring files between a local PC and Linux VPS:

Step 1: Download PuTTy and PuTTy SCP (pscp).

  • You need to download PuTTy, and PuTTY SCP (pscp) if you don’t have it in your system.
  • Ensure pscp.exe is in your system’s PATH or navigate to its directory using the command prompt.

Step 2: Transferring files using “pscp”.

    • Open Command Prompt. You can either search and open it or just use Windows key + R, then type cmd to open it.
    • Now navigate to the directory containing the “pscp.exe”. You can do that by running this command in the CMD.
      $ cd C:\Program Files\PuTTY

  • Use the following command to transfer the file to the Linux VPS

Command format:
$ pscp path\to\local\file username@VPS_IP:/path/to/remote/directory

To transfer C:\Users\YourUser\Documents\transfer.txt to /home/your_vps_user/ on the VPS, use this command:
$ pscp C:\Users\YourUser\Documents\transfer.txt
your_vps_user_name@VPS_IP:/home/your_vps_user/

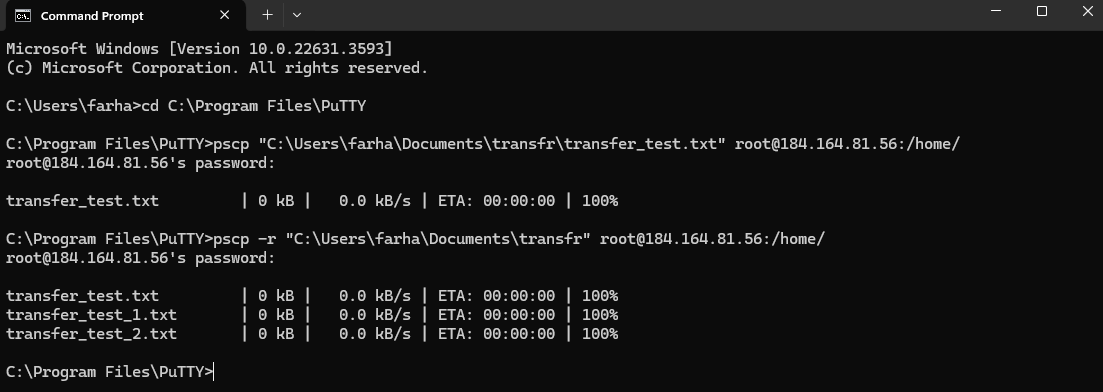
If your VPS’s IP is: 184.164.81.56 and your files name is: transfer_test.txt and the VPS’s username is root, then the command will look like this:
$ pscp “C:\Users\farha\Documents\transfr\transfer_test.txt” root@184.164.81.56:/home/

If you want to move a folder to the linux VPS, then the command will look a bit different.

Command format:
pscp -r path\to\local\folder username@184.164.81.56:/path/to/remote/directory

If your folder’s name is “transfr”, then the actual command will look like this:
pscp -r “C:\Users\farha\Documents\transfr” root@184.164.81.56:/home/

Step 3: Verify if the file has been transferred successfully.

  • If you want to check if the file has been transferred, then open PuTTy and login to the VPS.
  • Then Navigate to the directory where you transferred it.
  • Go to the directory by using $ cd home
  • Then use this command: $ ls


If you want to remove the file, then use the “rm” command.

Step 4: Removing a file or directory if needed.

    • $ rm tranfer_test.txt
    • Then use this command: $ ls

      If you want to remove a directory, then use “rm -r” command
    • $ rm -r transfr
    • If you type $ ls again, you will no longer see the file or directory there.

This is how you can easily transfer files from your Windows VPS or PC to a Linux VPS via SSH.

Transferring files between two Linux VPS:

You can also transfer files from one Linux VPS to another Linux VPS. For that follow the instructions given below:

  • Open Command Prompt
  • Login to your Source VPS that contains your files, then type this command and hit enter:
    $ ssh root@source_vps_ip
  • Enter your VPS password. (You may be asked to type yes or y to confirm the connection before entering the password).
  • Determine which file you want to transfer and the location/directory of the file.
  • You can use the “scp” command to move files between a source VPS and a destination VPS.
  • General Command format:
    $ scp “/home/folder1/filename.ext” root@destination_ip:/home/folder2/filename.ext

Here “/home/folder1/filename.ext” is the location/directory of the file in the source VPS. This part is for the destination VPS “root@destination_ip:/home/folder2/filename.ext”.
Here root@destination_ip is the username@destination_ip, :”/home/folder2/filename.ext” is the destination directory to transfer the file/folder.

For Example, If the Destination VPS’s IP is: 170.205.52.101 and the username is “root”; and the file is in “home/transfr” directory in the Source VPS (184.164.81.56), then use the following command to transfer the file:
$ scp “/home/transfr/new_file.txt” root@170.205.52.101:/home/

If you check in this Destination VPS: 170.205.52.101 you will see the file there.

If you want to transfer the whole folder/directory, then just add “-r” after “scp”.
The command will look something like this:
$ scp -r “/home/transfr/” root@170.205.52.101:/home/

If you check again, you will see the folder there now.

You can transfer files from VPS (170.205.52.101) to VPS (184.164.81.56) too. Just change the IP and directory name accordingly.
$ scp “/file name” root@184.164.81.56:/home/
For folder/directory:
$ scp -r “/Folder or directory name/” root@184.164.81.56:/home/
This is how you can transfer files between two different Linux VPS easily.

FireVPS offers both Windows VPS/RDP and Linux VPS. Buy Windows VPS/RDP and Ryzen Linux VPS from FireVPS for your VPS hosting needs. If you are still having any issues or confusion, please feel free to knock us on Live Chat from our website. Our support team is always ready to help you.
FireVPS / Live Chat / Skype / support@firevps.net

Domain Registration

Need Domain Name?

85% Promo on Domain Names

Data Center

Dedicated RDP

Poland RDP 50% recurring discount!

Recent Post

How to Test Network Speed on Linux VPS

How to Test Network Speed on Linux VPS

How to Test Network Speed on Linux VPS

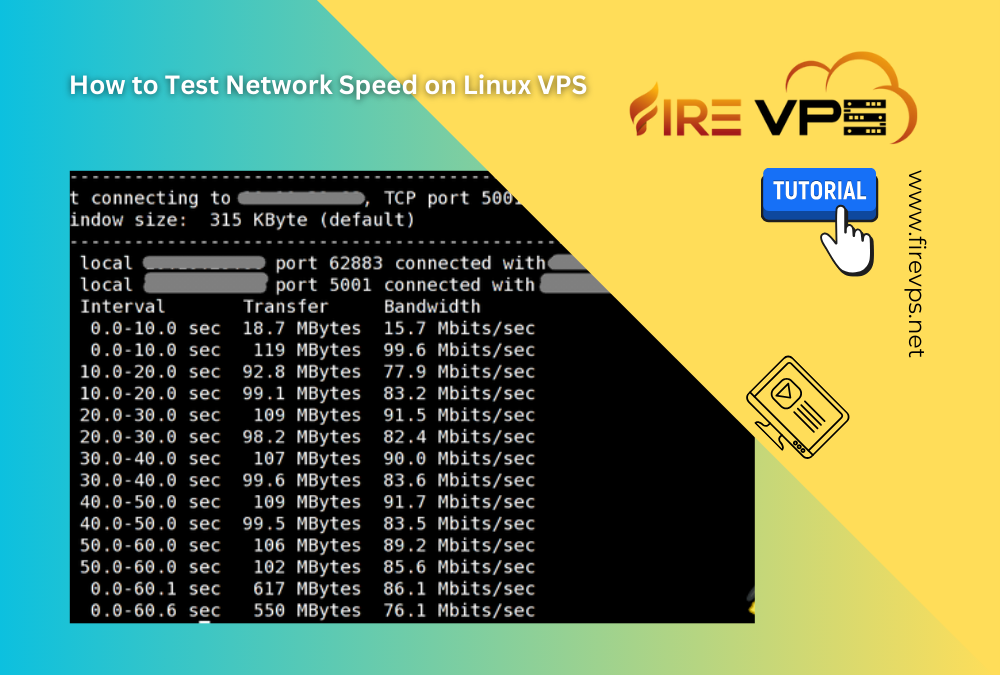
We usually check the internet speed to verify if the network is okay or if we are getting what we have paid for. For Windows, Android or other GUI (Graphical User Interface) based OS, it is pretty simple. You can just open a web browser and type “speed test”. Many results will show up and you can use any of them to check the speed. Or you can use speedtest apps like OOKLA speed test or others.

While it is pretty simple for Windows or other GUI based systems, it can be a little challenging on CLI based systems like Linux. In this tutorial, we will show you how to install a speed test application in a CLI based Linux system and check the internet speed.

For this tutorial we will be using a Linux VPS with Ubuntu 20.04

Let’s get started then…

Connect to the Linux VPS with a SSH Client like PuTTY. Once you are connected to the Linux VPS, check the version of the OS. It can be done by running this command:
$ lsb_release -a

Once you know the type and version of the Linux OS, you can continue to the next step which is installing the speedtest application via CLI.
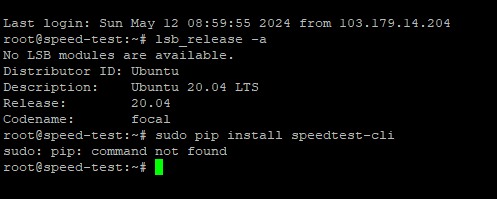
You need to install “pip” (a python package manager) before installing the speedtest CLI. If you run the command before installing “pip”, you will get this kind of error:

To install pip, use these commands:
$ sudo apt install python3-pip

Once the pip is installed, use this to install the speedtest CLI on the Linux VPS:
$ sudo pip install speedtest-cli

Once the installation is completed, run this to test the speed:
$ speedtest-cli


You can list the available servers and choose a specific server for checking the speed.

To list the available servers, run this command:
$ speedtest-cli –list

To select a specific server, you need to run this command (replace the SERVER_ID_OR_NAME with actual ID or name):
$ speedtest-cli –server SERVER_ID_OR_NAME

The server ID can be found by running this command:
$ speedtest-cli –list

Running this command for server ID 27746 will show this kind of result:
$ speedtest-cli –server 27746

You can even generate a shareable link of the speedtest. If you want to generate a shareable link of the speed test against server 27746, you can run this command:
$ speedtest-cli –server 27746 –share

You can go to this link to check the speedtest result on the web:
Weblink: http://www.speedtest.net/result/16241259205.png

All these tests were run on a Linux VPS running Ubuntu 20.04. The VPS was hosted on our USA server which was connected to a 10Gbps network port. The speedtest result may vary depending on the server load and network traffic. These commands will work on Debian based Linux distros.

For CentOS or RedHat or other Scientific Linux distros, you can run these commands:

To install Python:
$ sudo yum install python
or
$ sudo yum install python3

You also need to install “wget”. To install it run this command:
$ yum install wget

To download and install speedtest_cli.py:
$ wget -O speedtest-cli
https://raw.githubusercontent.com/sivel/speedtest-cli/master/speedtest.py
$ chmod +x speedtest-cli

For checking the internet speed:
$ ./speedtest-cli
Or
$ python speedtest-cli

You can run these simple commands to test the internet speed of your Linux VPS and verify you are getting what you have paid for.

FireVPS offers several Linux distros with their AMD Ryzen Linux VPS. While the default network port for the Linux VPS is 1Gbps, you can get Linux VPS from FireVPS with a 10Gbps network port. This concludes our tutorial on how to test internet speed in a Linux VPS.

If you are still having any issues or confusion, please feel free to knock us on Live Chat from our website. Our support team is always ready to help you.
FireVPS / Live Chat / Skype / support@firevps.net

Domain Registration

Need Domain Name?

85% Promo on Domain Names

Data Center

Dedicated RDP

Poland RDP 50% recurring discount!

Recent Post